Samuel Hammond and the Map of Cowpens

Any narrative regarding the maps of the Battle of Cowpens starts and ends with the story of Samuel Hammond. Hammond (1757–1842) drew the only important, authentic map of the Cowpens battlefield by an eyewitness.
Hammond had a long career in public service. He started as a militia volunteer at age 17 in his native Virginia, distinguishing himself at the Battle of Point Pleasant on 10 October 1774. Moving to South Carolina in 1779, he continued in militia service, fighting at most of the important battles in the southern war, including Musgrove’s Mill, Blackstock’s Farm, and Eutaw Springs. After the war, he served in many capacities, notably as the first governor of what became the Missouri Territory and as a member of the South Carolina legislature.
But, it was his service at Cowpens that draws our attention. Hammond was a major in the South Carolina militia at the time of the battle. His unit’s commander, Colonel James McCall, was detailed to the cavalry. Command of his infantry regiment passed to his lieutenant colonel, Joseph Hays, and to Major Hammond. Hammond’s unit occupied the far left of the American front line. Long after the war, Hammond put pen to paper and created one of the most visible first-person memoirs of the battle. No one knows how long he waited to write his memoir. It was found by his son among his papers after his death. There may have been as many as fifty or sixty years between the event and the writing. Historians tend to agree that his narrative bears the scars of a long passage of time.
His memoir was important, but it contained a map that proved overwhelming, because it was the only one authenticated to an eyewitness. The other two candidates, the Clove map and the Pigree map, cannot be proven to be from participants, and, in fact, seem to be drawn from reference to Morgan’s report on the battle.
Morgan wrote his report two days after the battle; Hammond drew his map fifty or sixty years later. Even so, they agreed remarkably well. Most notably, both placed all the American forces in two lines. The main line consisted of the Continentals with militia units on flank guard. The front line placed four militia rifle regiments between the Continentals and the British. This is in stark contrast to the bulk of writings about Cowpens, which insists Morgan formed the Americans into three lines of battle. Here is the first of two pages of Hammond’s map, reprinted, with his memoir, into Joseph Johnson’s 1851 book, Traditions and Reminiscences:
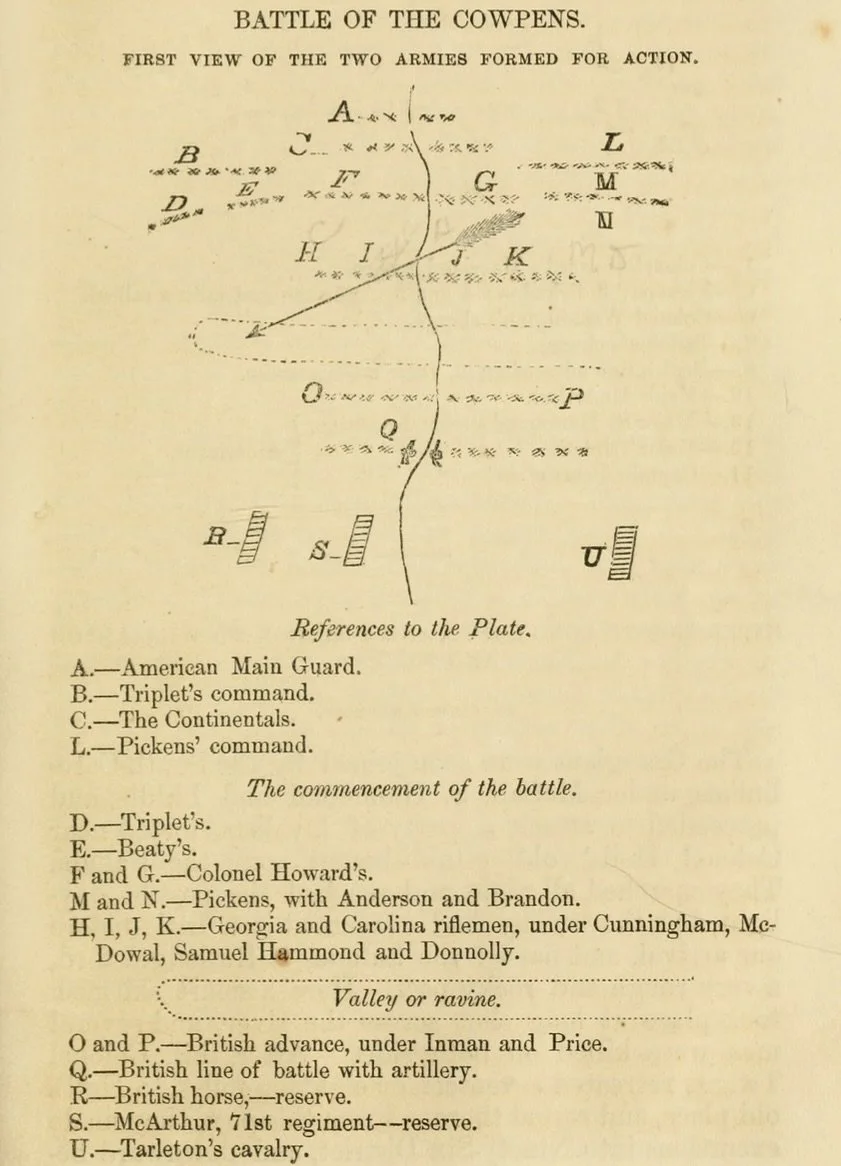
At best a sketch, Hammond covered the main points of Morgan’s deployment. He started with an outline, elements A, B, C, and L; these he indicated as the “References to the Plate” in the explanation. Although unclear, he used the same map to depict details, shown as “The commencement of the battle” in the explanation. Hammond depicted four rifle regiments in the front line, elements H, I, J, and K. The main line contained Continentals in a double rank, shown on the map as elements F and G. The Continentals normally formed in a triple rank, but there were too few at Cowpens, so a double rank had to suffice. The main body of militia he showed as elements M and N, a multiple rank of militiamen under Andrew Pickens, on left flank duty. The right flank was staffed by a body of Virginia militia, many of them former Continentals, elements D and E. Morgan’s report on the battle agreed with all these deployments. The only points of disagreement were with the names of two of the four regimental commanders on the front line. They agreed on Cunningham and McDowell (or McDowal), disagreed on the other two.
Hammond prepared a second page to his map, detailing events following the initial deployments:
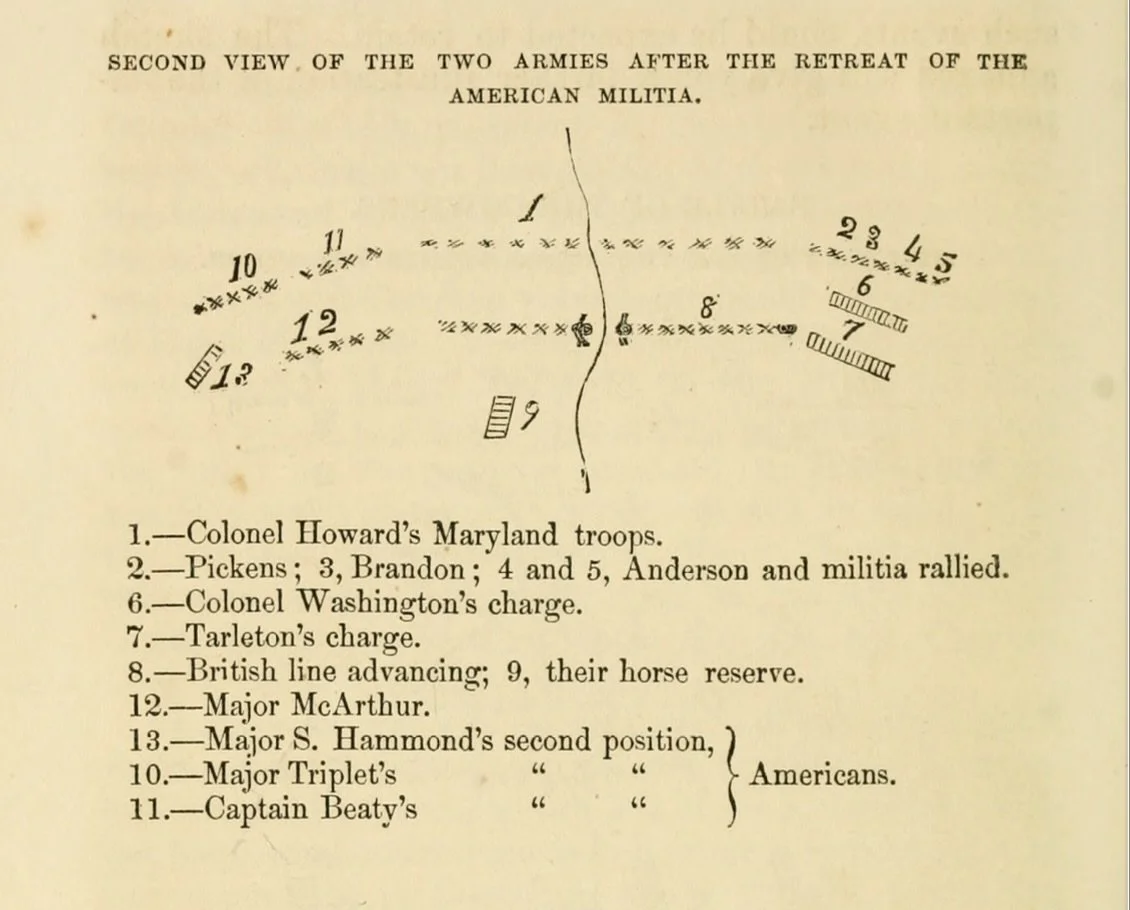
The second page telescopes many events in the battle. Morgan gave orders for the militia to withdraw behind the Continentals when the British advanced. The riflemen on the front line, whose reloading time was in the range of one to two minutes per round, had time to make one, but no more than two, shots, then withdraw. On the main line, Morgan deployed the militiamen who arrived for battle bearing muskets. As shown on page one of the Hammond map, these men, under Pickens, he placed in a multiple rank, Continental-fashion. On the right flank, the Virginia militia contained one rifle unit, the Augusta Riflemen, and otherwise were armed conventionally with muskets. Morgan’s orders for the right flank were not clear; as a force with a large number of former Continentals, he may have expected them to stand fast in the face of the British assault. There was no question that Pickens’s men had orders to withdraw after firing a limited number of volleys. They performed as ordered, “Colonel Picken’s Command then kept up a Fire by Regiments retreating agreeable to their Orders.”
Page two of Hammond’s map shows the British cavalry charge on the American left, element seven, and the American counterattack, element six. It shows the main British advance, element eight, as well as the response of the Continentals, element one. Finally, it depicts the events at the extreme end of the engagement, when the militia, after the Continentals had thoroughly broken the main British advance, rallied and reformed. At this point, many authors have asserted the Continentals and militia united to achieve a double envelopment of all or part of the British forces on the field. These authors are wrong; there was no envelopment on the field. The Continentals broke the British infantry assault, and the survivors scattered, to be rounded up by the American cavalry. While the militia may well have rallied, it was at a time when the heavy lifting had been accomplished. Hammond’s map reinforced this point, noting the maximum extent of militia penetration was element thirteen, on the British left flank, but nowhere near an envelopment.
Hammond’s map has been a key piece of the history of the Cowpens engagement. Although not a model of clarity, it has proven sufficient to illustrate Morgan’s report on the fighting.